2021. 9. 29. 01:03ㆍai/Deep Learning
import numpy as np
import tensorflow as tf
# 입력데이터의 형태
# 가로길이 : 3, 세로길이 : 3, 이미지의 개수 : 1, channel을 1로 사용
# (이미지의 개수, height,width,channel) => (1,3,3,1)
image = np.array([[[[1],[2],[3]],
[[4],[5],[6]],
[[7],[8],[9]]]], dtype=np.float32)
# print(image.shape) # (1, 3, 3, 1)
# filter의 형태
# (filter height, filter width, filter channel수, filter 개수)
# (2,2,1,1)
weight = np.array([[[[1]],
[[1]]],
[[[1]],
[[1]]]], dtype=np.float32)
# print(weight.shape) # (2, 2, 1, 1)
conv2d = tf.nn.conv2d(image,
weight,
strides=[1,1,1,1],
padding='VALID')
sess = tf.Session()
result = sess.run(conv2d)
# convolution 결과
# (이미지 개수, height, width, channel)
# (1,2,2,1)
print(result.shape)
print(result)
# 일반적인 color 이미지인 경우 convolution 처리
# %reset
import numpy as np
import tensorflow as tf
# 입력이미지 형태
# (이미지 개수, height, width, channel)
# (1, 3, 3, 3)
image = np.array([[[[1,2,3],
[1,2,3],
[1,2,3]],
[[1,2,3],
[1,2,3],
[1,2,3]],
[[1,2,3],
[1,2,3],
[1,2,3]]]], dtype=np.float32)
# print(image.shape) # (1, 3, 3, 3)
# filter의 형태
# (filter의 height, filter width, filter channel, filter 개수)
# (2,2,3,2)
weight = np.array([[[[1,2],
[1,2],
[1,2]],
[[1,2],
[1,2],
[1,2]]],
[[[1,2],
[1,2],
[1,2]],
[[1,2],
[1,2],
[1,2]]]], dtype=np.float32)
# print(weight.shape) # (2, 2, 3, 2)
conv2d = tf.nn.conv2d(image,
weight,
strides=[1,1,1,1],
padding='VALID')
# convolution 결과
# (이미지 개수, height, width, channel)
sess = tf.Session()
result = sess.run(conv2d)
print(result.shape) # (1, 2, 2, 2)
print(result)
# 여러 용어들과 API를 사용하기 위한 형식을 알아보았어요!
# convolution은 이미지의 특징을 추출하는 작업이예요!
# 어떻게 표현되나요?
# %reset
import numpy as np
import tensorflow as tf
import matplotlib.pyplot as plt
import matplotlib.image as img
# subplot을 만들어요. (왼쪽에는 원본, 오른쪽에는 convolution한 결과 이미지)
fig = plt.figure()
ax1 = fig.add_subplot(1,3,1) # 1행 3열의 첫번째
ax2 = fig.add_subplot(1,3,2) # 1행 3열의 두번째
ax3 = fig.add_subplot(1,3,3) # 1행 3열의 세번째
ori_image = img.imread('./images/girl-teddy.jpg') # 이미지 객체 생성 => ndarray
ax1.imshow(ori_image)
# ori_image의 type
# print(type(ori_image)) # <class 'numpy.ndarray'>
# 원본 이미지의 shape
# print(ori_image.shape) # (429, 640, 3)
# 입력이미지 형태
# (이미지 개수, height, width, channel)
# (429, 640, 3) => (1, 429, 640, 3) 형태로 바꿔야 해요!
input_image = ori_image.reshape((1,) + ori_image.shape)
print(input_image.shape) # (1, 429, 640, 3)
channel_1_input_image = input_image[:,:,:,0:1]
print(channel_1_input_image.shape) # (1, 429, 640, 1)
# 실수로 전환
channel_1_input_image = channel_1_input_image.astype(np.float32)
# filter
# (3,3,1,1) => (height, width, channel, filter 개수)
weight = np.array([[[[-1]], [[0]], [[1]]],
[[[-1]], [[0]], [[1]]],
[[[-1]], [[0]], [[1]]]], dtype=np.float32)
# stride : 1
# padding : VALID
conv2d = tf.nn.conv2d(channel_1_input_image,
weight,
strides=[1,1,1,1],
padding='VALID')
sess = tf.Session()
result = sess.run(conv2d)
# convolution 결과
# (이미지 개수, height, width, channel)
print(result.shape) # (1, 427, 638, 1)
t_img = result[0,:,:,:]
print(t_img.shape) # (427, 638, 1)
ax2.imshow(t_img)
# pooling 처리
# result => (1, 427, 638, 1)
# 일반적으로 pooling처리할때 kernel size와 stride를 동일하게 설정
pooling = tf.nn.max_pool(result,
ksize=[1,3,3,1],
strides=[1,3,3,1],
padding='VALID')
pooling_result = sess.run(pooling)
print(pooling_result.shape) # (1, 142, 212, 1)
pool_img = pooling_result[0,:,:,:]
ax3.imshow(pool_img)
fig.tight_layout()
plt.show()

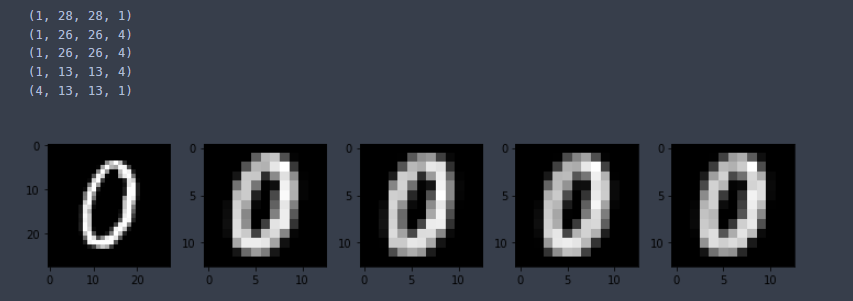
# MNIST 예제를 이용해서 이번에는
# Relu처리도 진행하고 filter의 개수도 늘려보아요!
# %reset
import numpy as np
import pandas as pd
import tensorflow as tf
import matplotlib.pyplot as plt
import matplotlib.image as img
fig = plt.figure(figsize=(10,5))
ax = list()
for i in range(5):
ax.append(fig.add_subplot(1,5,(i+1)))
# Raw Data Loading
df = pd.read_csv('./data/mnist/train.csv')
img_data = df.drop('label', axis=1, inplace=False).values
# print(img_data.shape) # (42000, 784)
# 이미지 확인
ori_img = img_data[5:6].reshape(28,28) # shape : (28,28)
ax[0].imshow(ori_img, cmap='gray')
# 입력이미지 형태
# (1, 28, 28, 1) => (이미지개수, 세로길이, 가로길이, channel 수)
input_image = ori_img.reshape((1,) + ori_img.shape + (1,))
print(input_image.shape) # (1, 28, 28, 1)
input_image = input_image.astype(np.float32) # 실수 전환
# filter의 형태
# (3,3,1,4) => (필터 세로, 필터 가로, 필터 channel, 필터 개수)
weight = np.random.rand(3,3,1,4)
# stride : 1
sess = tf.Session()
conv2d = tf.nn.conv2d(input_image,
weight,
strides=[1,1,1,1],
padding='VALID')
conv2d_result = sess.run(conv2d)
print(conv2d_result.shape) # (1, 26, 26, 4)
# Relu
relu = tf.nn.relu(conv2d_result)
relu_result = sess.run(relu)
print(relu_result.shape) # (1, 26, 26, 4) => shape의 변화는 당연히 없어요!
# pooling 처리
pool = tf.nn.max_pool(relu_result,
ksize=[1,2,2,1],
strides=[1,2,2,1],
padding='VALID')
pool_result = sess.run(pool)
print(pool_result.shape) # (1, 13, 13, 4)
# 그림을 표현하기 위해서
# 축을 교체
# (1, 13, 13, 4) => (4, 13, 13, 1)
i = np.swapaxes(pool_result,0,3)
print(i.shape) # (4, 13, 13, 1)
for filter_idx, t_img in enumerate(i):
ax[filter_idx+1].imshow(t_img.squeeze(), cmap='gray')
fig.tight_layout()
plt.show()
'ai > Deep Learning' 카테고리의 다른 글
| Dog & Cat img → csv (0) | 2021.09.30 |
|---|---|
| CNN mnist code (0) | 2021.09.29 |
| convolutional Neral Network (CNN) 합성곱 신경망 (2) | 2021.09.28 |
| 이미지 기본 handling 코드 (CNN기초 ver) (0) | 2021.09.17 |
| CNN 기초, 이미지 처리 (0) | 2021.09.17 |